
Git, Explained
This blog introduces Git workflow, and how to use it for source code management. Put it simply, Git enables version control between multiple programmers to work locally and update via a shared codebase like GitHub.
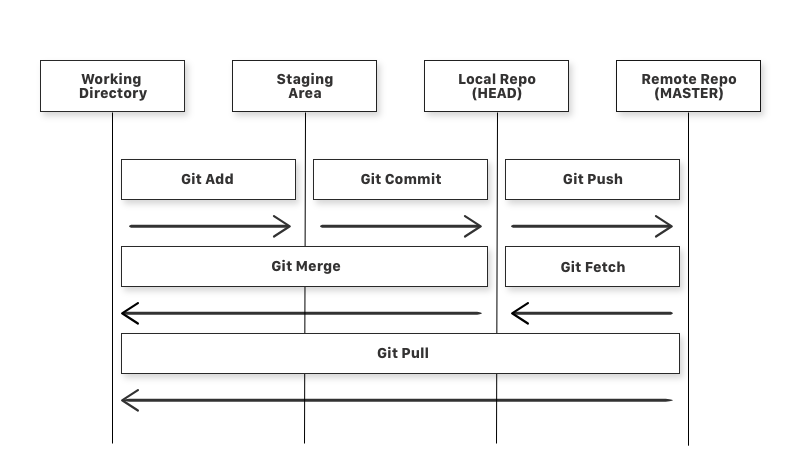
Simple Git Workflow
Figure below shows a simple workflow for using Git to maintain a repository. Working directory is the local folder that each programmer works on, such as adding or removing some files. Staging area places all the changes to be commited next. Local Repo (HEAD) is the repository stored on the local machine, and Remote Repo (MASTER) is the repository stored on the remote side.
Basic Git Commands
Local Repository
git clone <remote-repository-URL> # Download from a remote repository, and place a copy to local directory
git init # Initiate an empty git repository
Add Files to the Staging Area for Commit
git add . # Stage all the files in local repo to commit area
git add README.md # Stage READMD.md to commit area
git status # Lists all new or modified files to be committed
Commit/Uncommit Changes to Local Repo
git commit -m "Commit Message" # Commit Message describes current commit to all other users
Suppose you just discovered that your last commit has some error or some unwanted files, do the following to unstage the files:
git reset HEAD~1 # Remove the most recent commit
Add a Remote Origin and Push
Up till now, all changes we made in the file are updated in local repository. To update the changes to the remote master. Do the following:
git remote add origin <remote-repository-URL> # Set the new remote
git remote -v # list the remote connections you have to other repositories
git push -u origin master # Push changes to origin
Examine the Changes Made to File
To examine the changes made on the files, do the following:
git diff # Show the file changes not yet staged
Revert Back to Last Committed Version
git checkout .
git checkout -- <filename> # Revert back to a specific file name
git log # See commit history made to the files
Advanced Git Commands
Branching
Branching function of Git allows multiple users to collaborate together.
git branch <branch-name> # Create new branch
git checkout <branch-name> # Switch to new branch
Git Fetch, Git Merge
In simplest terms, git fetch followed by git merge equals to git pull.
git pull automatically merges the commits into the working branch without reviewing them first. git fetch gathers all commits that do not exist in current branch from target branch and stores in local repository, but does not merge them with working directory, allowing further examining on local and remote files before git merge.
git pull origin master # Merge commits from remote origin into master branch
git fetch origin master # Fetch commits from remote origin into master branch, stores in local repo
git merge origin master # Merge to working directory
Stash Current Working Directory
git stash records the current state of the working directory, and goes back to a clean working directory. The command saves the local modifications away and reverts the working directory to matcht the HEAD commit. Do the following if you have uncommited changes in the directory, and you hope to merge current changes:
git stash # Add the uncommited changes to stash
git merge # Merge current changes
git stash pop # Obtain changes back from the working tree
Git Rebase
git rebase moves the entire branch to another branch. For sake of simplicity, assuming that we have branch feature from branch master, and both branches have been worked on for a while. We hope to merge all the changes on feature branch onto master branch. Do the following:
git checkout feature
git rebase master # Above two commands are equivalent to git rebase master feature
Note that merge conflicts often occur, as master branch has some unique changes from feature branch. Do the following to solve them:
git add <file-name>
git rebase continue
git rebase --skip # Or, skip the conflicted commit
git rebase --abort # Or, stop rebasing